Data Write on LCD from Microcontroller:-
Here we will learn how o write something on LCD with the control from Microcontroller.Liquid Crystal Display also called as LCD is very helpful in providing user interface as well as for debugging purpose. The most common type of LCD controller is HITACHI 44780 which provides a simple interface between the controller & an LCD. These LCD's are very simple to interface with the controller as well as are cost effective.The LCD requires 3 control lines (RS, R/W & EN) & 8 (or 4) data lines. The number on data lines depends on the mode of operation. If operated in 8-bit mode then 8 data lines + 3 control lines i.e. total 11 lines are required. And if operated in 4-bit mode then 4 data lines + 3 control lines i.e. 7 lines are required. How do we decide which mode to use? It’s simple if you have sufficient data lines you can go for 8 bit mode & if there is a time constrain i.e. display should be faster then we have to use 8-bit mode because basically 4-bit mode takes twice as more time as compared to 8-bit mode.
To write a character (Data) INTO the LCD display, it is necessary to preset RS High, R/W low, character byte at Data Pins 7-14, and then pulse CE pin up once.
Suppose we have the Data to write at the LCD at the accumulator, so the routine DataWrite would be:
Assembly Language program to write data on LCD, this is microcontroller code written in assembly language to write data on LCD
Mov P1,A ; Post Accumulator at LCD data input
Setb RS ; Set RS high (Data)
Clr RW ; Set RW low (Write)
Nop ; Wait circuit settling
Setb CE ; Tells the LCD to work (receive data byte)
Nop ; Wait a little bit
Nop ;
Clr CE ; Drop the selection line
Ret ; Return to Caller
END
circuit diagram to show PIN configuration of LCD.
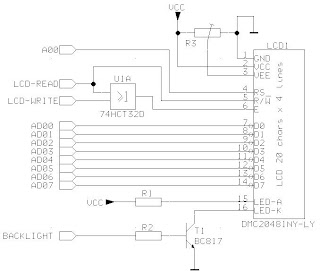
Here is circuit diagram to interface LCD with Microcontroller 8051:-
In our project LCD data ports are connected to the port 1 of the controller & its control pins i.e.: RS, E ,R/W are connected to the pin 3.5 3.6 & 2.1 of the controller. We initialize the LCD and it start showing data i.e. clock. In order to do the correction of time we also provide the connection with PC using serial port of the controller.
It is very important to keep a track of the working of almost all the automated and semi-automated devices, be it a washing machine, an autonomous robot or anything else. This is achieved by displaying their status on a small display module. LCD (Liquid Crystal Display) screen is such a display module and a 16x2 LCD module is very commonly used. These modules are replacing seven segments and other multi segment LEDs for these purposes. The reasons being: LCDs are economical, easily programmable, have no limitation of displaying special & even custom characters (unlike in seven segments), animations and so on. LCD can be easily interfaced with a microcontroller to display a message or status of a device. This topic explains the basics of a 16x2 LCD and how it can be interfaced with AT89C51 to display a character.
Tags:-
monitor,lg lcd monitor,lcd monitor price,lcd monitor review,lcd computer monitor,acer lcd monitor,viewsonic lcd monitor,
lcd monitor 17" lcd monitor,lcd vs plasma,lcd datasheet,sony lcd,lcd projector,samsung lcd,samsung,lowest common denominator
Routine interfacing LCD with 8051 Programmer's Corner.
how to interface keypad and LCD with microcontroller 8051,How to show a message over a LCD and also moving a motor using a 8051,The Web is littered with examples of how to control the standard Hitachi-44780 LCD using an 8051 micro-controller. LCD type HD44780 interfacing tutorial with microcontroller PIC, 8051 and AVR. character based LCD HD44780 CGRAM and DDRAM explaination with pinouts.8051 microcontroller hardware interfacing tutorials LCD Display with assembly language code example. Display Data RAM (DDRAM) LCD Commands, register busy,Interface-program HD44780u based 16x2 LCD using 8051,AT89C51.Programming code and initialization sequence,LCD cursor address,ciruit diagram and pin diagram.One of the most common devices attached to an 8051 is an LCD display. Some of the most common LCDs connected to the 8051 are 16x2 and 20x2 displays.
BACK to Content Page
. Next Page
. Previous Page


No comments:
Post a Comment